tensorrt基本使用
2022-03-10
使用tensorrt的基本知识
1、使用tensorrt的基本流程
一般有五个步骤:
- 导出模型
- 选择一个batch size
- 选择精度
- 模型转换
- 模型部署
2、tensorrt的基本组成
tensorrt有两部分组成:
- 各种将模型转换成tensorrt使用的优化表示的方法
- 部署模型时不同的runtime
如下图所示:

3、模型转换
有三种办法可以将模型转化成tensorrt使用的优化表示版本,这个优化表示版本称为engine。
- tf-trt,这是tensorflow集成好的tensorrt提供的功能
- 自动的从.onnx格式的文件转化
- 手动使用tensorrt提供的api构建network,可以选择python或c++语言
tensorflow集成的tensorrt不仅提供了模型转换功能,还提供了一个高层抽象的runtime API,这个运行时的好处是当碰到tensorrt不支持的算子时,可以自动fallback到tensorflow的实现。
从onnx文件转化,是更优的方式,因为它是框架无关的。可以使用tensorrt的api或者trtexec这个工具。需要注意的是,如果onnx中包含了tensorrt不支持的算子,就需要为不支持的算子提供专门的插件,否则转换将会失败。
使用tensorrt api构建模型,可以达到最大的效率。简单讲就是用tensorrt api将模型覆写一遍,然后将原始模型的参数传给它。
4、模型部署
有三种使用tensorrt部署的方法:
- 使用tensorflow部署
- 使用独立的tensorrt runtime api
- 使用nvidia的 triton inference server
使用tensorflow部署最简单,使用tf-trt转换模型,然后将它当做普通的tensorflow模型部署就可以了。
使用tensorrt runtime api部署,对tensorrt的掌控更精细。可以对不支持的操作提供插件。经常和onnx格式转换搭配使用。
triton inference server是一个开源的推断服务软件。可以部署各种框架中的模型,如:tf,tensorrt,pytorch,onnx runtime,甚至是一个定制的框架等。类似于tfserving。
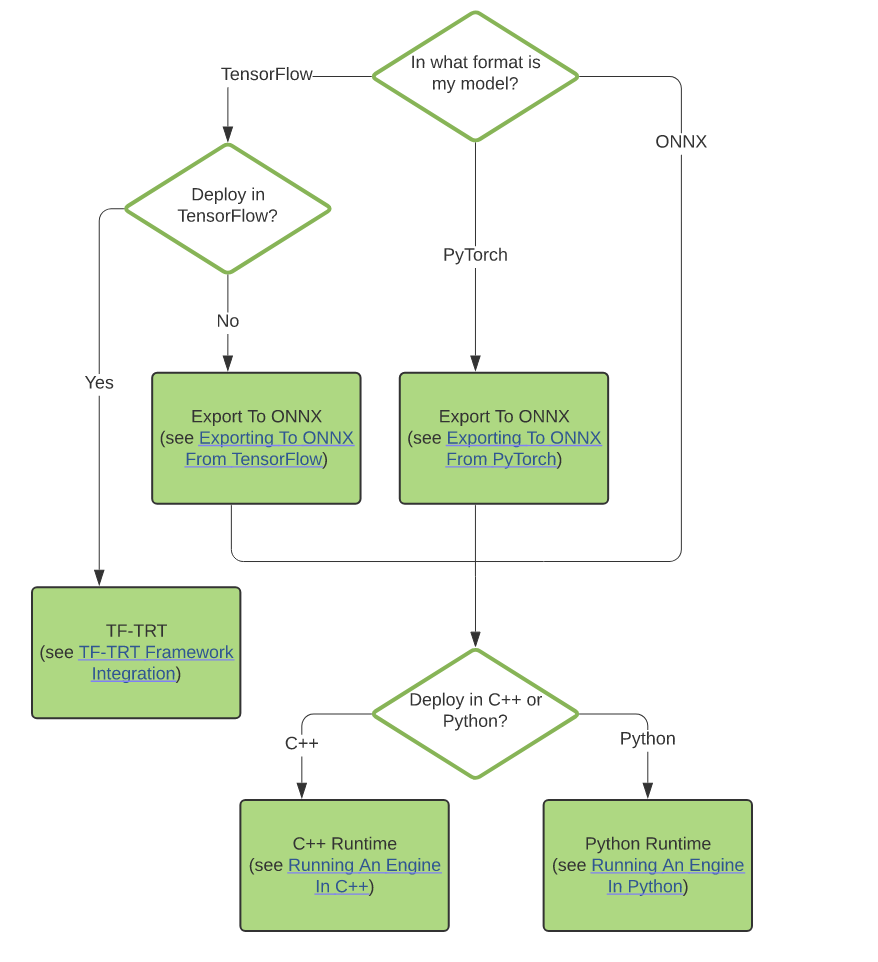
5、转换和部署选择逻辑
如下图所示:

6、使用onnx部署实例
1)设定batch size
指定batch size,tensorrt就可以针对模型做更多的性能优化。如果服务属于延迟敏感的,就选择小一点的batch size,如果属于吞吐敏感的,就选择大一点的batch size,这是总的原则。大的batch size延迟会大,但平均到每条样本的处理时间会减少。具体是使用pytorch导出时,就是设定dummy_input的batch size。
如果不想固定batch size,需要动态的batch size,在下一篇中专门介绍。
2)选择精度
在预测时,需要的精度往往比训练时要低。这可以让我们在预测时选择较低的精度,以便减少内存消耗,提高预测速度。tensorrt支持如下精度:
- TF32
- FP32
- FP16
- INT8
具体使用详见下面的部署过程。
3)转换模型
将onnx的模型转换为tensorrt使用的engine,是最常用的功能。对于固定shape的模型,trtexec是tensorrt提供的转换工具。可以对network做逐层的profile和将onnx转化为trt格式的文件。
这个命令行工具需要单独安装,具体安装程序参考: https://github.com/NVIDIA/TensorRT/tree/main/samples/trtexec
使用trtexec将onnx转为trt文件的命令:
trtexec –onnx=resnet50/model.onnx –saveEngine=resnet_engine.trt
trtexec的工作原理是使用tensorrt的 onnx parser api来加载onnx模型,然后使用builder api来构建一个engine,这一过程是非常耗时的,通常离线进行。
它支持如下参数:
--fp16  对支持fp16的layer,启用fp16精度。类似参数有  --int8。

--best  对所有layer,启用性能最优的精度。

--workspace  指定最大可用内存,实际使用时,越大越好。tensorrt runtime运行时只分配必要的内存

--minShapes 、 --maxShapes 和 --optShapes  用来设置optimization profile。这个和动态shape有关,会在动态shape的文章中详细讲。

--buildOnly   仅构建,跳过性能测量。
验证构建的engine是否可用,使用如下命令:
trtexec --shapes=input:1x3x1026x1282 --loadEngine=fcn-resnet101.engine
–shapes用于动态shape的engine。会用随机值填充该shape的tensor。
看到输出:PASSED
表示engine创建成功。
4)部署模型
可以使用tensorflow集成好的tensorrt,也可以使用独立的tensorrt runtime。ONNXClassifierWrapper 底层调用的是独立的runtime。使用方法如下:
BATCH_SIZE=32
PRECISION = np.float32

from onnx_helper import ONNXClassifierWrapper
N_CLASSES = 1000 # Our ResNet-50 is trained on a 1000 class ImageNet task
trt_model = ONNXClassifierWrapper("resnet_engine.trt", [BATCH_SIZE, N_CLASSES], target_dtype = PRECISION)

dummy_input_batch = np.zeros((BATCH_SIZE, 224, 224, 3))

predictions = trt_model.predict(dummy_input_batch)
如果不想使用wrapper,可以使用如下的代码: https://github.com/NVIDIA/TensorRT/blob/main/quickstart/SemanticSegmentation/tutorial-runtime.ipynb
代码主体部分如下:
import numpy as np
import os
import pycuda.driver as cuda
import pycuda.autoinit
import tensorrt as trt

import matplotlib.pyplot as plt
from PIL import Image

TRT_LOGGER = trt.Logger()

# Filenames of TensorRT plan file and input/output images.
engine_file = "fcn-resnet101.engine"
input_file  = "input.ppm"
output_file = "output.ppm"

# For torchvision models, input images are loaded in to a range of [0, 1] and
# normalized using mean = [0.485, 0.456, 0.406] and stddev = [0.229, 0.224, 0.225].
def preprocess(image):
    # Mean normalization
    mean = np.array([0.485, 0.456, 0.406]).astype('float32')
    stddev = np.array([0.229, 0.224, 0.225]).astype('float32')
    data = (np.asarray(image).astype('float32') / float(255.0) - mean) / stddev
    # Switch from HWC to to CHW order
    return np.moveaxis(data, 2, 0)

def postprocess(data):
    num_classes = 21
    # create a color palette, selecting a color for each class
    palette = np.array([2 ** 25 - 1, 2 ** 15 - 1, 2 ** 21 - 1])
    colors = np.array([palette*i%255 for i in range(num_classes)]).astype("uint8")
    # plot the segmentation predictions for 21 classes in different colors
    img = Image.fromarray(data.astype('uint8'), mode='P')
    img.putpalette(colors)
    return img

def load_engine(engine_file_path):
    assert os.path.exists(engine_file_path)
    print("Reading engine from file {}".format(engine_file_path))
    with open(engine_file_path, "rb") as f, trt.Runtime(TRT_LOGGER) as runtime:
        return runtime.deserialize_cuda_engine(f.read())


'''
Inference pipeline:

Create an execution context and specify input shape (based on the image dimensions for inference).

Allocate CUDA device memory for input and output.

Allocate CUDA page-locked host memory to efficiently copy back the output.

Transfer the processed image data into input memory using asynchronous host-to-device CUDA copy.

Kickoff the TensorRT inference pipeline using the asynchronous execute API.

Transfer the segmentation output back into pagelocked host memory using device-to-host CUDA copy.

Synchronize the stream used for data transfers and inference execution to ensure all operations are completes.

Finally, write out the segmentation output to an image file for visualization.

'''
def infer(engine, input_file, output_file):
    print("Reading input image from file {}".format(input_file))
    with Image.open(input_file) as img:
        input_image = preprocess(img)
        image_width = img.width
        image_height = img.height

    with engine.create_execution_context() as context:
        # activate optimization profile 0
        context.active_optimization_profile = 0#增加部分
        # Set input shape based on image dimensions for inference
        context.set_binding_shape(engine.get_binding_index("input"), (1, 3, image_height, image_width))
        # Allocate host and device buffers
        bindings = []
        for binding in engine:
            binding_idx = engine.get_binding_index(binding)
            size = trt.volume(context.get_binding_shape(binding_idx))
            dtype = trt.nptype(engine.get_binding_dtype(binding))
            if engine.binding_is_input(binding):
                input_buffer = np.ascontiguousarray(input_image)
                input_memory = cuda.mem_alloc(input_image.nbytes)
                bindings.append(int(input_memory))
            else:
                output_buffer = cuda.pagelocked_empty(size, dtype)
                output_memory = cuda.mem_alloc(output_buffer.nbytes)
                bindings.append(int(output_memory))

        stream = cuda.Stream()
        # Transfer input data to the GPU.
        cuda.memcpy_htod_async(input_memory, input_buffer, stream)
        # Run inference
        context.execute_async_v2(bindings=bindings, stream_handle=stream.handle)
        # Transfer prediction output from the GPU.
        cuda.memcpy_dtoh_async(output_buffer, output_memory, stream)
        # Synchronize the stream
        stream.synchronize()

    with postprocess(np.reshape(output_buffer, (image_height, image_width))) as img:
        print("Writing output image to file {}".format(output_file))
        img.convert('RGB').save(output_file, "PPM")
Refs:
https://docs.nvidia.com/deeplearning/tensorrt/quick-start-guide/index.html
https://developer.nvidia.com/zh-cn/tensorrt
原创文章,转载请注明出处,否则拒绝转载!
本文链接:抬头看浏览器地址栏
最新文章
- 2025年文章总结 2025-12-29
- Flux-Text执行流程记录 2025-07-14
- livetalking数字人执行流程 2025-07-13
- Step1X-Edit执行流程(二) 2025-06-25
- Step1X-Edit执行流程(一) 2025-06-24
- 女儿突然知道关心人了 2025-04-28
- shfl_xor_sync原语 2025-04-22
- MHA, GQA, MQA, MLA的代码 2025-04-01
- Bank Conflicts简介 2025-03-05
- FlashAttention解读 2025-03-01